


- - - - - - -
Sometimes things magically fall into line.
Example: for the past few weeks, I've been gradually redoing our hall closet, which is just around the corner from the kitchen.
I don't have before pictures of said hall closet, because I was totally embarrassed by the space. It was full of random junk: our extra towels and linens piled up messily, miscellaneous decor that I stuck in there as I changed things out for the holidays, a box full of broken glass (?! Yeah, not safe), random tools, our vacuum, etc. Nothing pretty or very functional at all, since it wasn't maximizing the space. In a teeny apartment like ours (since we both have plenty of stuff...lemme tell ya!) we needed to be maximizing each and every space!
I thought for a while about how the space needed to function, and I realized we were in desperate need of a real pantry. Our kitchen is teensy and there's barely enough space for our dishes and our food. We definitely do not have a designated in-kitchen pantry spot. After salivating over some gorg pantries (hello House of Smiths and Decor Chick!) I wanted to have my own pretty pantry space. Obviously, in an apartment I can't paint the back of our pantry like Shelley, but I could do my best to prettify through containerizing and labeling! (Plus, I knew if I invested smartly in durable containers, I could remove them and use them in our more permanent pantry--can't wait to make over that one!) So I set to work!
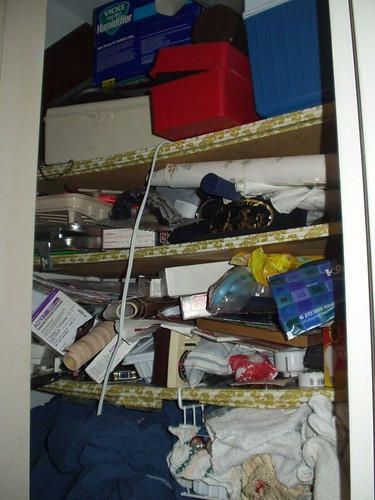
Of course, now I'm kicking myself for not taking a before picture, because it could come in handy right now! If I had to pick a picture that could represent the mess, this would work:
 [image from here]
Except my shelves are the white wire ones without a pretty liner like that.
Anyway. I've been working on the great hallway crap pile... I mean, closet redo, which has entailed moving stuff that didn't belong (like our tools and our stockpile of toilet paper and paper towels...all relocated to the new shelves in the laundry room!) as well as containerizing and prettifying the whole space and our cabinets, too. I finished last week and have been dying to blog about it. Then I come to find that this week's CSI project theme is "Pantries, Closets & Cupboards!" PERFECT motivation to get this blog post up and running now :) And, even more magically, I found myself done with my homework and done with grading, so I had a little down time in which I could blog. Oh happy (and rare!) day!
My closet did not magically fall into place, though. It took some effort! So here's the final result and then some step-by-step info for those that are organizing/container freaks like me!
Disclaimer: I am not a crazy hoarder. I SWEAR! (though my fiance tries to paint me as one...) We are Costco fans, though! Buying in bulk can save a lot of money if it's something you legitimately use all the time! As long as you don't buy stuff that spoils soon or stuff you just want to try out and end up disliking, it's super helpful! Thus we have a lot of groceries for only two people, but they last us :)
Okay, so here's the after shot of half of the pantry--we have those annoying sliding apartment doors so I can't show you both sides at once:

Let's zoom in:

This side features my excess baking stuff (flour, powdered sugar, sugar) and more of the sweet snacks (graham crackers, oreos, etc). I used Better Homes & Gardens' small pantry labels (download free here!) in orange to label everything--just printed them out and laminated them, then used double-stick tape to affix them to the containers. Speaking of which...I got all of the Oxo SoftWorks Pop containers from Ross or TJ Maxx for $5.99 - 11.99 each-- a big savings from their normal retail prices! Seriously, those stores are like container heaven for me! If you don't have a TJ Maxx or a Ross near you, I don't know how you function. Seriously. Confession: I may or may not have bought out the entire stock of those containers at both stores...in a period of about a month. Once I started I couldn't resist. Confession 2: The containers used to be on our registry. But I saw them on sale and had to get them! Confession 3: I may be a shopaholic. No, I am not paid by Ross or TJ Maxx to blather on about their greatness..I WISH!

I got the large green basket months ago on sale at Michael's. It holds our excess bags of cereal & snack food--I like to get rid of the bulky boxes right away. I wanted to use it in the living room on our entertainment unit, but it was too big to fit on the shelves! I had it in our outdoor storage closet but I rescued it during the great pantry creation :) The under shelf basket was a recent Ross find: $10 for two of them! Since the wire shelving didn't offer the best support for the wire basket (read: the basket hung off of it and was useless) I had to do some crafty thinking. So I tied the basket on to the shelves with some spare twine, like so!

I was a little worried that the twine wouldn't hold the weight of the basket (especially since it stocks a lot of our bulk canned food) but it has held up well! If it starts sagging, I'll add more twine :) I love that I can easily reuse these baskets when we switch pantries!
Okay, now to zoom on the other side. This is more of our salty snacks and our great noodle collection! The fiance loves pasta! (Can I just say that containerizing our Costco packs of Mac N Cheese, while time consuming, was so worth it? We were never able to finish a whole box by ourselves and a little bit always went to waste...now I can just scoop up less noodles & less cheese mix and we'll get more servings out of it! Saves money and calories! Love!)


The pink bag holds our colored plastics. We have most of our recycling in the front closet, but it's a bit crowded, so I put the least-likely-to-overflow stuff in the prettiest bag and popped it on the floor in here. The other under-shelf basket (tied with twine again) holds more excess canned goods (beans for chili! Soups for casseroles!) and other bulk purchases.

I also put our olive oil in the pantry, because I'm trying to cut back on our usage...I've been following HungryGirl's advice and using Pam on the stovetop or foil packets in the oven to cook our food instead! (I know the Pam thing sounds bizarre but it works...tastes just as great with 0 calories!) So it's an out of sight out of mind thing. But funny story: I bought these great number decals on Very Jane a while back and then found the perfect bottle to use one on at TJ Maxx ($1.99! Cute & cheap, just how I like 'em!) So I put on the decal, then poured in the oil. Perfect!
Later that night I realized I'd used the "No. 1" decal on the bottle...and the oil looked very yellow in the jar...I'll let you put two and two together on that one. It looked like I had bottled up something very unappetizing. My fiance won't let me live that one down!
Moving on...


Since this closet also borders our laundry room and bathroom, the top shelf of the pantry houses our spare linens and towels. We always kept them in there, but they ended up in messy piles that would occasionally fall of the shelf in a colorful cascade of terrycloth. They're much prettier (and less avalanche prone) in their new baskets. I got the large brown one from Michael's, the sunburst patterned milk crates at Target ($4.94 on sale in May), and the longer media baskets at Target, too (here they are!) They're great for stacking!
As I said, I also did some reorganizing in our food cabinets, too, since the new pantry allows them a little breathing room. I'd already acquired some containers over the summer after my second-ever visit to the Container Store (loooooove! I got two of these and one of these and a medium one of these) and after we had to move my grandma into an assisted living place :( Since she doesn't have her own kitchen anymore, she gave me a lot of her old organizing stuff, like white rubbermaid bins and wire spice racks. So I put those things to use in our revamped cabinets.


One of the spice racks holds our Campbell's soups. The under-shelf basket houses instant rice, canned chicken & crab, and canned chiles (love them on nachos or in chicken tortilla soup!) I corralled our spice packets in the little wire basket. I also made & laminated my own labels so that the fiance can help me put away stuff :) Otherwise it's "Where does this go?" all the time ;) I just stuck 'em on with double-sided tape.

I also made a pantry inventory (stuck on the back of the door) to keep track of what we had (since the cabinet is brimming with stuff!) Easy peasy: I just picked some scrapbook paper, cut it to size, and printed a list of our most-purchased goods on there. Whenever I cook something for dinner or buy new stuff and put it away, I update the list with a dry erase marker stuck on the door with a velcro command strip. When I'm getting low on something, I write the number in red so I can easily see what we need when I'm making grocery lists.

I bought two mini fabric bins at Target (here) to hold our boxed meals (Chicken Helper, Mac n Cheese, etc.) It makes it way easier to reach the boxes, since I have to stand on tiptoe to reach them.

The repurposed soda can dispensers from Container Store make the frustrating corner cabinets way less annoying! All the usually wasted space (a whole FOOT!) is eliminated because I can push these babies back in the Siberia corner and they'll dispense our canned goods. When we're running low I grab some extras from the pantry and load 'em up! Love!
Check out how much room there is back in Siberia:

Score! No wasted space for me! Now I'm in search of an inexpensive slim bin to put the Chef Boyardee in to make it easier to grab...

The other cabinet is less impressive--it holds our snack foods and breakfast bars/drinks.


We also have a lazy susan in our lower corner cabinet (Love it!) I store our cereals, pasta sauces, brownie mixes, and extra condiments down there.
Last two. The dreaded slim spice cabinet and the above-microwave hideaway. These two used to be the bane of my existence. The spice cabinet was stuffed full of the little bottles. No spice rack would fit in there. To get out the larger bottles positioned in the back, I had to take out literally all of the other spices. The above-microwave space, however, was almost empty. I had some mixing bowls up there, but that didn't take advantage of all of the vertical space the cabinet had to offer. So BOOM! I mixed some stuff up!

I took one of the wire spice racks and popped it above the microwave. Then I added the taller spices/mixes (gravy mix, taco sauce, & cinnamon sticks, all from Costco) to the spice rack, along with bulkier/less used spices (like the extra salt & pepper, bouillon cubes, special BBQ spices, etc.) This maximizes the vertical space and makes it easier for me to make out all of the labels and reach all of the bottles! Love. The other side of the cabinet holds a lazy susan with some of our larger/bulkier bottled stuff used in cooking--Pam, vinegar, Crisco, cooking wines, etc.

I'd already streamlined the spice shelves by banishing the lesser-used/bulky bottles to above the microwave, so I just organized the bottom shelf by placing the spices I use more frequently there. The second shelf holds baking supplies--cinnamon, nutmeg, vanilla, cocoa, baking soda & powder, etc. The top shelf stores my cupcake stuff (silicone liners, holiday liners, sprinkles) and cookie cutters. Since I don't always need to access those things (wish I could--but I'm dieting for the wedding, people!) I felt okay putting them way up high.
So that pretty much covers the great pantry/cabinet redo! Now run out to Ross or TJ Maxx and snag up some containers of your own!! And stay tuned because I'm hoping to blog about our freezer organization and share some of the little decor changes I've made around the house :) Plus, fall is coming up--which means fall decor will be broken out soon! :)
Linking up here! :)

P.S. Yay! I made the top ten projects!


BRITTANY, OMG, this is great. I wish there was a before pic! I see those stunning labels; I used them too and love seeing them every day. Love how you organized the cans. Everything is so organized and tidy. Thanks for stopping by Order Matters today.
ReplyDeleteLooks awesome. I might just have to start labeling things
ReplyDeleteYour pantry looks great! Thanks for your kind comment on my blog. I love those can dispensers. What a great idea. I hate wasted space too.
ReplyDeleteThis pantry is inspirational. It makes me feel bad about mine though but it totally inspires me to make it better. thnx for sharing
ReplyDeleteI love your pantry organization! And, thanks for the tip on the OXO containers at Ross or TJ Maxx. I'll have to keep an eye out. Also, I see you're a fellow Montanan. :)
ReplyDeleteI love your pantry! I would love to have a pantry full of OXO's food storage.
ReplyDeletebeautiful job! We also got our oxo containers from the home goods store... can't beat the prices!
ReplyDeleteI am working on my pantry and this inspires me :)
ReplyDeleteLooks SO wonderful!! I LOVE those containers!!! They are currently on the TOP of my organizing wish list - Great job!
ReplyDeletePopp'n over from iheart organizing!
-H
Your pantry cabinet looks great! What a great idea. I hate wasted space too.
ReplyDeleteI love all your ideas! Looks like you're really maximizing your space. If you find the twine doesn't hold, you could try those plastic zip (cable) ties? Then just snip them off if you want to remove the shelf.
ReplyDeleteGreat organization! I would recommend that unless you go through the cereal quickly, to store into glass containers. They will absorb the flavor of the cellophane and plastic containers over time. Crackers and chips especially are bad for absorbing that plastic taste.
ReplyDelete