Saturday, March 31, 2012

Handmade Thank You Notes!

Since I love a good DIY, I decided to go ahead and make my own Thank You notes to send to my wedding guests. I wanted to create colorful, fun, and inexpensive ones.

After browsing a few wedding books (picked up at the library by my wonderful Mother-in-Law), I saw an idea that I wanted to modify. I don't have an exact picture since it's from a book, but here's a similar one from Martha herself:

{via}

Basically it's a paper card that's cut and folded to look like a heart. You unfold it and the message is written on the inside. I loved the idea of unfolding the card to reveal the message--but I thought instead of hearts, why not make it an envelope?

So I hit up Michael's and got a pack of colorful cardstock, a pack of fun patterned scrapbook paper, and some plain white cardstock. I cut each piece of white cardstock in half, cut the colored paper into rectangles to surround the white, and then cut the colored cardstock into rectangular strips. I used a coffee can to trace a round edge at the top of each piece of colored cardstock to form the envelope lip, then cut it out.

Next came the assembly. I used double-stick tape to adhere the white cardstock to the patterned paper, then the patterned paper to the colored cardstock. Some folding, and voila! I had a card and envelope all in one!


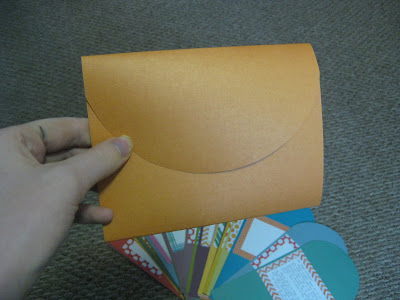
There are tons of patterns and colors:


And here's one all gussied up on the front, addresses removed for privacy:


This was a really affordable and easy thing to do--gotta love 40% off coupons and crafts that you can do while watching TV. And older sisters who also help you craft ;)

If I hadn't gone the DIY route, these options from Etsy caught my eye, too:

{via}

I love the graphic splashiness of this one from Lovebird Paper.

{via

Our wedding was peacock-themed, so this card from Soda-Pop Prints would've fit right in!
 

{via}

I love photo cards, and the simplicity of this design by Mink Cards! We'll probably use a wedding photo for our Christmas cards this year.


{via}

Quatrefoils? Check. Paper cutouts? Check. Fun fonts? Check. Bright colors? Check. Love it! This one's from Paperdipity.


{via}

Yaymeeralee designed this sleek chevron card...I like the teal version the best!

{via}

This fun typographic card from Lulaloo Cards also struck my fancy.


How do you say "Thank You!"?? And is anyone else in the mood to browse Etsy for hours on end now?


Pin It!

Wednesday, March 28, 2012

Office overhaul: our computer/craft closet

Welcome to part two of my office makeover! On Monday I shared how I uncluttered my desk area. Today I'm going to reveal our newly organized computer/craft closet! It houses all of my crafting supplies AND my husband's computer stuff--cords, components, boxes, etc. Previously the space was messy and underutilized. We weren't taking advantage of the space at all. We had popped a chrome shelf on one side, but my husband's computer parts were unruly (even though I bought the reddish baskets with the hope that he'd containerize his cords):


On the other side we'd stashed his camp box and hadn't used any of the valuable vertical space:


I wanted the space to function as craft/computer cord storage, and I knew for that to work that we needed to get rid of that camp box, buy a matching chrome shelf, and pop it in to my side of the closet! Once we gained a ton of shelf space, I went wild and collected containers from throughout the house. Some were crowding my desk area and some were hanging out in our storage closet unused. Some are just cardboard boxes covered in cute scrapbook paper. The only new items I purchased to organize my stuff were two wire undershelf baskets for holding yarn and in-progress crafting projects. So the best part of my side of the closet is that it only cost me $9.99! After some labeling, I placed everything on the shelves. Here's how it ended up:


My husband's side was the trickier one. He has so many cords, cables, and miscellaneous computer parts, some of which are very bulky. I knew I needed larger storage options, and probably clear ones, too, since he accesses his stuff more and needs to be able to see what's where. I ended up buying four large clear file bins from Costco ($12.99 for a set of two) and two stackable blue baskets from Target ($5.99 each). We had previously organized some of his smaller cables and cords into plastic shoeboxes from Target ($5 for a set of 5), which I marked with Better Homes and Garden's rectangular pantry labels.

So I pulled out all of the baskets and boxes that were on the shelf and the husband and I sorted everything into piles. Some things went into the existing labeled shoeboxes while others went into the new clear bins and blue baskets. Once we were done sorting, I printed and laminated some of BHG's large pantry labels and just wrote on them with a wet erase marker since the official names of some of the items wouldn't fit on their template. You can get all of the labels here. And here is the lovely after:


And here are some side-by-side before and afters:


I love how bright and cheery the closet is, but more importantly how the space functions now. It's so easy for my husband to locate what he needs. He recently had to fix a broken fan in my computer, and he said it was much less of a headache because he could locate all of his supplies.

And I love how my craft supplies are no longer overwhelming my desk area. I was actually able to remove a supply-stocked shelf that used to reside next to my desk, and the room feels much less cluttered now! Plus, I was able to use the red baskets that previously resided in the closet to organize our laundry room!


Pin It!

Monday, March 26, 2012

Office overhaul: de-cluttering my desk

Confession #1: I’m married to a computer nerd.


Confession #2: I’m a little addicted to Netflix, Pinterest, EW.com, and reading blogs.
All of these facts mean that the husband and I spend a good chunk of our time in our office, aka the second bedroom of our 2-bedroom place. In fact, we could probably rename the space our “living room” since we do most of our living in it while we’re at home.
Since we spend so much time in the space, we obviously look at it a lot. And we were both getting a little tired/annoyed/claustrophobic in the space, because (confession #3) I have a lot of stuff, and it was kinda sprawled all over. See these before photos as proof:
A memo station behind the door + a tall shelf stocked with office supplies to the right of my desk + cluttered desk and book shelves = an all-over-the-place look. 
I decided to do something about the space, especially because it felt like I spent at least an hour each week cleaning up my desk area, which told me that it wasn’t functioning in the best way. So I developed a plan!
Here’s how it went down:
Step 1: Relocate books, office supplies, and tchotskes that were crowding my desk and the surrounding bookshelves.
My books were already grouped by color (yeah, I’m cool), so I grabbed the blue ones and added them to a side table in our bedroom…

Before:


After:


…the white/brown/black ones and added them to the bookshelf in our living room:

Before:


After:


…and the orange, yellow, and bright ones and (after storing most of my graduation memorabilia, which I didn’t really need/want out anymore, anyway) stashed them on the top of our office bookshelf.

Before:


After:

Step 2: Get rid of the items that I wasn’t really using in order to tackle the cluttered/claustrophobic vibe the room was giving off.
In this portion of the office overhaul, I went through my desk drawers, rid them of anything that didn’t belong (like some miscellaneous Kleenex travel packs, which were moved to under the bathroom sink) and consolidated like items with previously bulky packaging (paperclips, post-its, etc.)
I also did some major purging by taking down my memo station. Since the bulletin boards were located behind the door, I really didn’t use them for much beyond pictures, so they were cute but had little function. I stored everything so that one day I can reinstate my memo station. I imagine it hanging over a desk—since mine has a hefty hutch with tons of storage, I don’t have space for the stuff right now.


And I eliminated the 4-tier blonde bookshelf by purging/consolidating/relocating its contents. Where did I relocate the supplies? And where did the shelf end up? Those questions are for another day, friends—all shall be revealed soon!
I elected to keep the top of my desk free save for a floral binder I use to store my students’ papers. Without all the stuff on top, it’s much lighter and less overbearing!


Step 3: Reorganize desk space to prioritize its main functions.
I knew I wanted certain books (the ones I use in teaching, plus some favorite anthologies and short story collections) handy since I reference them frequently, so I left those on my desk shelf. I cleared the cubbies of their current clutter (tongue twister for ya!) and then designated a function for each: the top holds current projects/to-dos, the middle houses my gradebook, notepad, and receipt folder, and the third holds old notebooks, my coupon folder, and things to file.
On the upper shelf, I stacked a few more anthologies that I access less frequently, but that didn’t fit on the other bookshelf. Plus I love their fun colors! I also stuck many of my most-used office supplies up there. The blue drawers contain sharpies, colored pens, dry erase markers, and highlighters. The small covered cans house paper clips and binder clips. I added some decorative things (the K, some snowglobes, a framed picture, and a photo strip) but tried to keep it balanced.
Here are a few more pictures of the office post-decluttering:
I can’t tell you how good it felt to finally get my work space uncluttered. I still have some purely-there-for-show “stuff," but they don’t overwhelm the space. Taking down the shelf and the memo station did wonders for the room!
My ideal desk in the future will have no hutch (I’ll just need more bookcases!) and a longer/larger work surface, but for now, my newly streamlined desk is looking good and serving its purpose!
Later this week I’ll share another large office project we (okay, I) recently tackled—our monstrous computer cord/craft closet! Behold the hideous befores:
And come back on Wednesday to check out the after!
I'm linking this up to the "Spring into Organization Blogger Home Tour" hosted by Becky from Organizing Made Fun, Jen from IHeart Organizing, Anna from Ask Anna, DaNita from Delightful Order, Lesley from Goodbye House, Hello Home, Becky from Clean Mama, Toni from A Bowl Full of Lemons, Leanne from Organize and Decorate Everything, and Laura from I'm an Organizing Junkie.


Pin It!

Friday, March 23, 2012

Fab Finds Friday: That Magical Place, Goodwill

I frequently experience a visceral yearning to shop. It hits at least once a week, and I do my best to suppress it, but eventually I succumb. I turn to Ryan and plead "I just really need to run to Ross," or "I'm going to nip into TJ Maxx, real quickly," or "Goodwill?" Usually he just looks at me like I'm bananas or sighs or says "Only if you bring home ice cream" (our Ross is next door to a Coldstone). He knows better than to reason with me when I have that itch.

But lately...I've been trying to NOT scratch that itch, and do the whole only buy what you need thing. You know, like a responsible, normal adult. Some people are just naturally more thrifty/practical than I am (like my sister!) and they can rationally turn away from things they like but don't actually need...but I've always had a problem with that. I'm a major impulse buyer. So to curb those impulses, I've banned myself from Ross, TJ Maxx, Target, and Goodwill until after my birthday (April 11). Then I'll buy myself a b-day/you-did-it! present IF it's something I love and have a spot for. I've already been on my no-shop plan for two weeks (that's a loooong time for me) and it's hard, but I shall press on!

But Brittany, you're saying to yourself. How can there be a Fab Finds Friday if you haven't shopped in two weeks? And to you I say this: before my self-imposed shopping moratorium, I went shopping a lot, and I saved some of my Goodwill finds to blog about today.

I spent $14 smackaroos and came away with a ton of loot!

I found this cutie cork bottle (which you may have spied in this post) for $0.99. It's a long-lost cousin of my other spice jars, which I snatched up at an antique mall this summer, $10 for the pair. Um, hello Goodwill and your cheapy prices. Love.


He fits right in with the others and holds our sea salt. I love the easy access for cooking!


I grabbed this fun floral tin for $1.99--only when I got home did I realize that there was a bonus tin inside! Sweet! The bonus tin will likely get a spray paint facelift, but I like the floral one as is.


I also got some silver candlesticks. I plan to pair the floral tin, candlesticks, and two vintage tins I got from two antique malls earlier this year and recreate this desk organizer:


{via}

Kinda like this, but with the 2 antique tins I own subbed in:


I also got a collection of glassware, ranging from $0.49 (the smaller jars) to $1.99 (the carafe). If you've ever gone thrifting or antiquing with me (or read about my antiquing finds) you'll see a pattern emerge: I'm always drawn to the glass.

The large carafe matches a smaller one I'd found at an antique store in Kansas City, seen here:

I'm on a milk glass kick lately. I don't like anything too ornate, but I do like the vases. I used this one to hold one of my pinwheel bouquets at the baby shower last weekend!


I grabbed the three small canning jars to use as votive holders:


One of them was still labeled. In 1980 it held Diet Gooseberry Jelly....mmmm.


I got the small amber jar to use as another candleholder or perhaps as a reed diffuser base. The candy jar is part of a DIY birthday gift I have planned, but probably won't get to until this summer since my Silhouette machine is back in Missouri.

This pair of pumpkins found their way into my cart as well...even though fall's a season away, I couldn't resist their woven look. I was contemplating spraypainting them white, but I think they might stay brown. What do you think?


Man, now I'm itching to go to Goodwill again. I've always had good luck at the one here, but my Missouri one isn't as good. Anyone else noticed that? Do people in Montana just have better taste? (Or worse because they get rid of cute/cool things?)


Pin It!

Pin It button on image hover