Showing posts with label diy projects. Show all posts

Monday, June 25, 2012

Etched State Art Tutorial & GIVEAWAY!

Hello everyone visiting from Sew Caroline! I’m Brittany. I started my blog as a means of keeping in touch with friends and family back home after I moved 1,409 miles away from my home state. Now I blog about DIY projects, my thrifty finds, décor, organization ideas, and the occasional recipe.

I’ve shared my love of maps and travel-related décor many a time here on my blog, so I thought it’d be fitting to feature a project along those lines in this post. So without further adieu, let me present my etched state print, with the how-to below & giveaway info below!


Isn’t it lovely? And it’s pretty easy to create! Here’s what you’ll need:


  • One frame (any size, but I recommend 5x7 or 8x10 for one state and 8x12 or 11 x 14 for two). I like to buy good quality frames at thrift stores; even if they’re a little ugly, a bit of spray paint freshens them right up, and they’re cheaper than buying new ones!
  • Digital craft cutting machine (like a Silhouette or Cricut) & vinyl OR a printout of your state of choice, clear contact paper, & an exacto knife
  • Etching cream (I use Armour Etch from Michael’s—it costs $12 for 10 oz but you’ll have plenty left over after this project!)
  • A foam brush
  • Decorative scrapbook paper or fabric (Note: originally I wanted to use a fun fabric to back my etched state, but then the etching didn’t show up! So instead I replaced it with a solid colored scrapbook paper. So, I suggest sticking with a solid paper or fabric.)
  • Your cat. (JK, not required, but my cat kept photobombing this shot.)

Start by selecting what state you want to etch. I chose Missouri because it’s my home state and I have a lot of MO pride!

If you’re lucky enough to own a digital cutting machine like the Silhouette or Cricut, at this point you should buy the silhouette of your chosen state to use with your machine. If you don’t have one of those nifty devices, don’t fret—you can still do this by hand! You’ll just need to find a silhouette of your state online. A simple Google Images search will do.

Those of you with the magical machines can now use them to cut your state silhouette onto your vinyl. Use clear or another color that you don’t mind etching over. Make sure you size your state properly so that it fits in the frame with plenty of background glass still around it. (I made mine around 5x7 for my 8x10 frame).

Those of you doing this by hand should copy and paste your state silhouette into Word, size it accordingly, print it out, and, using your exacto knife (or scissors if you’re a good cutter or your state doesn’t have many intricate details), cut out the outline of your state. Now cut a piece of contact paper large enough to fit the state. Take your paper template of the state and trace it onto the contact paper. Cut it out, and you’re done making your vinyl for etching!

Now’s the easy part. Remove the glass from your picture frame, and wash and dry it. Make sure it’s very dry.

Next take the vinyl state you created with your cutting machine or your contact paper and remove the sticky backing. Place it where you want on the frame (I’m a front and center kind of girl, but maybe you want it to be a little asymmetrical?) Press down the edges of the vinyl very firmly—you don’t want any of the etching cream to leak under the state.

Once you’ve firmly placed the vinyl, grab your etching cream and brush it evenly over the frame’s glass.


Wait 15 minutes or as directed according to your etching cream or spray. You want the cream to set enough that you won’t smudge it when pulling up your vinyl. After the allotted time has passed, remove the vinyl and admire the prettiness!


Let your glass set overnight. Then the next day, grab your pretty paper or fabric, measure the glass, and cut the paper or fabric to size. Pop in the glass with the etching cream face up, then place the paper or fabric, then top it off with the back of the frame! Voila! You can now rep your state in a pretty way!


Do you like it? Enough to make one of your own? Well I’m giving you the chance to do just that! That’s right, you have the chance to win your own state (or country) silhouette vinyl so that you can create your own etched print! Note: just the vinyl—you’ll have to grab your own frame & etching cream :)


To enter, visit Caroline HERE and follow the instructions!

And if you're not visiting from Sew Caroline, I encourage you to check her out!


First of all, she and her husband are adorable. She sews adorable things (and just started up an awesome pattern review series!):


She shares delicious recipes:


She DIYs:


And wears the cutest outfits!


And if you are visiting from there, welcome! Here are a few of my favorite projects that you might like to check out :)


I hope you'll stay a while!


Pin It!

Monday, June 11, 2012

Whozits and Whatsits Galore

No, this post was not sponsored by The Little Mermaid. Rather, it's about a quick craft project I did to dress up a quartet of thrifted jars.

I first picked up one of these lovely lidded jars at Goodwill in Missoula for $0.99.


(In case you're confused, it's the one on the very back left with all the yellow arrows pointing to it. Ha!)

I scooped up a trio of matching jars for $3 total on a recent thrift trip, and then perused Pinterest for a little inspiration. What could I do with my new group of jars?

Should I add a vintage label and use them to stash cotton balls, bandaids, and Q-Tips in the bathroom?

{via}

Or apply some etched labels and stock them with treats in the kitchen?

{via}

Eventually, I realized that my ideal project was right under my nose. I'd pinned these "Things & Such" jars a few months ago and it turns out the jars I'd bought were actually identical to those ones (a happy coincidence!)

{via}

Since I had four jars, I decided to use two phrases: Odds & Ends andThis & That. Whozits and Whatsits didn't make the cut, but almost did, so I couldn't resist titling the post in this manner :)

This was a super simple project: I just washed the jars, used my Silhouette to cut out some chalkboard labels, then adhered them to the jars. I left my chalkboard pen in Missoula and am too cheap to buy a new one (ha!) so I just used some regular old chalk to write on the labels. (Even though using real chalk gives me the hives, and makes my handwriting look like a 5th grader's!)


For now, the jars hold my washi tape, glue sticks, stamps and ink pads, tape, etching creme, and binder clips. They're cute, functional, inexpensive, and easy to make--four of my favorite things when it comes to DIYing!


And so, another project was checked off my craft to-do list! Since it's summer, I hope to get at least 10 of the DIYs on my "Gotta Craft This" board done. So far, I've completed the wedding shadowbox and now these jars. I better get a move on!


Pin It!

Wednesday, June 6, 2012

Wedding Shadow Box

Last week I shared an easy DIY project I plan to add to our wedding wall--a pinwheel canvas. Now I'm back to share another way to commemorate our big day: a shadow box! This is a simple project that you can customize to celebrate any event--a milestone birthday, your child's birth, a vacation, etc.


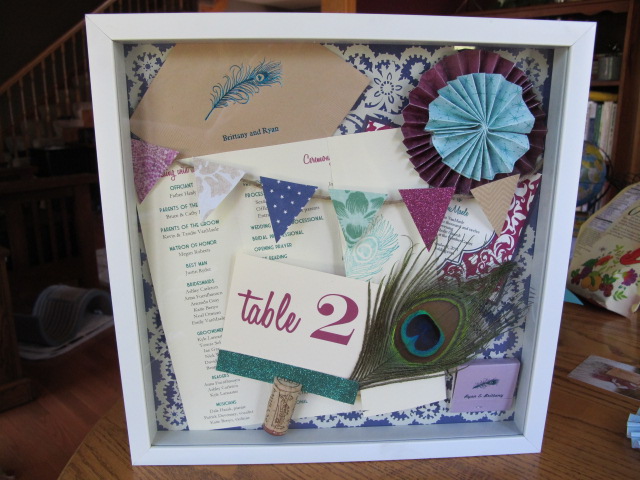
First, I collected my supplies: more pinwheels from my wedding, our program, a table number from the reception, one of our personalized napkins and matchbooks, our invitation, some mini bunting that we used to deck out our card basket, a "pop quiz" we had each guest fill out, and the paper and vellum overlay we used for our centerpieces, as well as a 12x12 white shadowbox from Target. I didn't end up using all of these things in the box, but wanted to collect many items so that I could play around with arranging things.


Then, just as with the pinwheel canvas, I played around with my objects until I'd settled on an arrangement I liked. I snapped a picture to help me reassemble it:


I decided to go with the dark purple paper with the lace vellum overlay because the other elements in the box really brought out more of our other colors (sangria and jade).


To attach the paper to the back of the shadowbox, I just used rolled bits of tape and applied 5 pieces--one in the center and one in each of the corners. I pressed firmly for around a minute to ensure that the paper would stay put. Some of my 3D items in the box, like the cork and the stacked pinwheels, will also keep the backing in place. Then I taped the lace overlay (from Michael's) to the paper. I just used a few pieces in the middle of the sheet since they'd be covered up by my program.


Then I proceeded by taping on the bottom layer of items first: the napkin, our invitation, the program (which I left half-splayed open to display our wedding party and the pretty peacock feather stamp on the outside), and the layered pinwheels. 


I placed the napkin at the upper edge of the box, so I had to wrap the top of it and tape it to the outside of the backing like so:


Next came the matchbook and the table number. I was a little worried about attaching the cork topper--I thought I might need to use a little hot glue--but tape worked just fine! If it ever comes off, I'll just use a dab of glue :) At our wedding, the table numbers were stuck in dark bluish-purple wine bottles that had the menus pasted to them--it was super cute! The mini bunting finished things off.


Then I just popped the backing into the shadowbox, and voilà! Another pretty way to display some of our wedding mementos.


For now it looks great next to the pinwheel canvas, but I'm itching to see how it'll be nestled in on the gallery wall. Now I only need to complete one more DIY and add a few honeymoon pictures, and the wall will be complete!


Pin It!

Wednesday, May 30, 2012

Pinwheel Canvas

As I shared in my gallery wall reveal and update, I have plans to expand the gallery to include a few crafts. I want to keep things visually interesting by not just including photos--plus I have some mementos from the big day, like our personalized napkins and programs, that I want to showcase as well. 

Some of those mementos are the many pinwheels that my sister, bridesmaids, and I lovingly made to cover the bulletin boards at our reception site. Here's what they looked like all dolled up that day:


{photo by Heather Breshears Photography}


I promise I'm sharing more details of the wedding--I'm saving that for our six month anniversary in July! :)

I wanted to replicate the look of the bulletin boards on a smaller scale for our gallery wall, so I decided to make a pinwheel-covered canvas!


And here's how you can make your own!

Supplies:

  • Canvas in your desired size (I picked up a 2 pack of 8 x 10 canvases on sale at Michael's--they regularly have specials on these)
  • Scrapbook paper (I used 8 small pinwheels, which takes 4 sheets of paper, and 5 extra small ones, which takes 2 sheets of paper)
  • Hot glue gun

Instructions:
  • First, make your pinwheels following the steps that I shared in this post :) As I said above, I needed 13 total to cover my 8 x 10 canvas--8 small and 5 extra small. You'll obviously need to make more if you want to cover a larger canvas. You can also make larger pinwheels to cover more space.
  • Now gather your pinwheels and canvas. Play around with a layout on the canvas by piling your pinwheels on until you like what you see. You'll need to layer the pinwheels to be able to cover the whole canvas. Remember to take a picture so that you remember how you want the final product to look!
  • Once you have your desired layout ironed out, remove the pinwheels and start gluing on the bottom layer. Since there's not a flat surface on the pinwheel, you'll need to apply a big glob of hot glue in order for it to stick. 

  • Once you've finished gluing the entire bottom layer, keep on gluing until all the pinwheels are on the canvas! Be sure to cover all the white spots.


And that's it :) An easy peasy craft that perfectly showcases our carefully made pinwheels, I think! I can't wait to see it nestled among our wedding photos. Next, I plan to make a shadowbox, a canvas monogram, and to add some of our honeymoon photos to the wall.


{via}


{via}


I really love how the project turned out! Imagine how cool it would look with a larger canvas, too--perfect wall art for a nursery, playroom, or fun craft studio!


Linking up to Tatertots & Jello for the Weekend Wrap-up party!


Pin It!

Pin It button on image hover