


Last Saturday (St. Patrick's Day) I attended a baby shower for my friend Kate from my graduate program! She's due in May and the MFA girls decided to throw her a shower. We're all giddy for her and can't wait to meet her little guy!
Of course, I couldn't resist making a few decorations for the partay. Call me crazy, but after making 96 tissue pouf balls and 100+ pinwheels for my wedding, I kind of missed folding paper...
Here are some pictures from the event--see below for the DIYs!

The adorable invitations are from Paperless Post--a great way to send cute and classy e-vites.


Orange and blue were the event colors--everything was so bright and cheery!


We had a delicious spread--macaroni and cheese, spinach & cheese frittata, pasta salad, mango salsa, spinach & artichoke dip, carrot cake, and a fruit rainbow!

To make the rainbow, I just cut up and arranged strawberries, clementines, mango, pineapple, banana, kiwi, green grapes, blueberries, and red grapes.


I also made my own version of these baby rattle marshmallow pops. I made white candy melts and added some sky blue food coloring, then put the marshmallows on cake pop sticks, dipped them in the candy melts, and sprinkled some rainbow non-pareils on top. I placed them in a cake pop stand from Wal-Mart (in the specialty cake decorating aisle--near the party stuff).
Now for the DIYs. I'm not the first to explain how to make either of these crafts--the wonderful Martha and Paper Source taught me all I know--but I made a few alterations to their tutorials, so I figured I'd still share!

To make the tissue paper flowers, first layer your tissue paper. I decided to use multiple shades of the same color on my flowers, so I layered the orange, then the peach, then the orange, etc. until I had layered 8 sheets total (4 of each color). For the blue flowers, I used 3 different shades of blue, so I layered the dark, aqua, and light, then repeated until I had layered 9 sheets total (3 of each color).


After I was done layering, I folded the sheets accordion style, then tied them in the middle with clear jewelry string (sorta like fishing line--find it in the jewelry aisle in your local craft store). Next, I cut the ends of the tissue paper to create the "petals." You can experiment with different cuts to create different shapes. I moved about 3 inches down from the top and swooped over to the top.
Once they're cut, the last step is to pull apart the layers of tissue paper to create the poufs. I like to fluff half the sheets on one side, then turn it over and fluff the rest.

Then return to the middle and fluff until the ball is spherical.
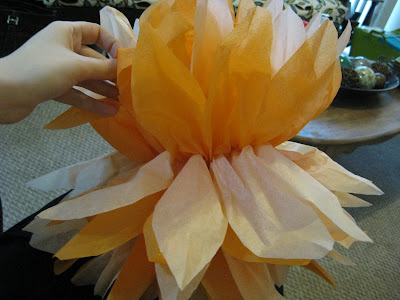

For my wedding, I (and my awesome bridesmaids) made 96 of these bad boys and used 12 sheets on each for a fuller flower, but these ones with 8 sheets turned out beautifully, too! I'd say 8-12 sheets is the amount you should go for. If you want to make different sized flowers (I did for my wedding!) you need to cut the tissue paper down to a smaller size before you fold it.
I also made these pinwheel bouquets:
Very easy and similar to the tissue flowers, except instead of layering your paper, you just fold one piece accordion style.

Once you're done, take the ends of the paper and tape them in the back so that the paper forms half of the pinwheel. Do the same on the other side to form a whole pinwheel. To make different sized pinwheels, use different sized papers. The larger ones were made from 12 x 12 pieces of scrapbook paper that I cut in half. The smaller ones are 12 x 12s cut into thirds. Medium-sized ones are about 2/3 of a 12 x 12 sheet of paper. For my wedding, we covered 2 large bulletin boards with many sizes and colors of pinwheels, so I made larger ones by folding entire sheets of 12 x 12 papers and tying them together.
Once I'd made the pinwheels, I glued them to different sized dowel rods to create the "flowers" of varying lengths. Now the pinwheels live above our memo station:


Lastly, I made two pennant banners for the party. For this one, I just bought scrapbook paper, traced triangles on the back, cut out the pennants, and taped them to some orange baker's twine.
I designed the "Happy Shower!" banner on Word. I just added triangle shapes with letters in them and printed it all out on a free chevron background from Sprik Space.

I made some of the partygoers pose with the banner before we left:

Overall, we had a great time at the shower, and I loved making the decorations!


Hey Lady! I actually have a question for you! How did you make your adorable blog button that's on Live Originally? I made one a while back that needs updating, but it was a pain in the butt, and I KNOW there's a different way to do it.
ReplyDeleteI messaged you on facebook, Sara!! I need to update my button, too. I want more fun colors in it now!
Delete