


As I mentioned in my last post, I am a big fan of the amazing website Dollar Store Crafts. What's not to love? DIY low-budget decor? I am so in! So I chose my top 5 favorite projects featured on their website, and decided to recreate 3 of them. Here's the first, with lots of in-progress photos and helpful tips:
Colorful tiered trays by Julie [Joy's Hope]

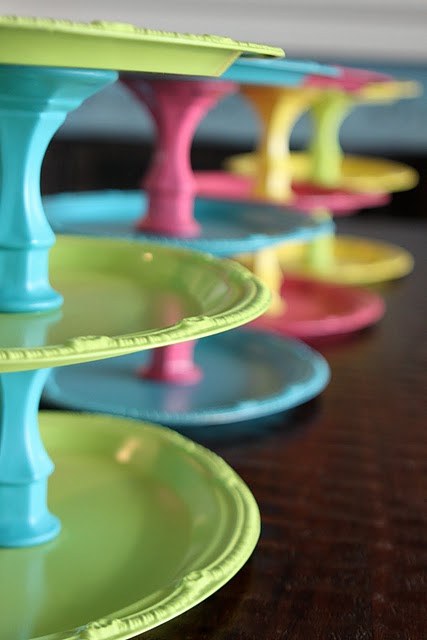
I love the colors featured in this picture, and thought they would match perfectly with my kitchen and dining room decor, so I wanted to mimic them in my project; however, I couldn't find a good lime green spray paint color, so I went with a chrome instead and used that color on the candlesticks that join the plates together. Also, since I have more of a modern style, I tweaked Joy's project by choosing decorative plates with a bubble pattern on the outside ring rather than the more shabby chic metal trays that she used.
I love the colors featured in this picture, and thought they would match perfectly with my kitchen and dining room decor, so I wanted to mimic them in my project; however, I couldn't find a good lime green spray paint color, so I went with a chrome instead and used that color on the candlesticks that join the plates together. Also, since I have more of a modern style, I tweaked Joy's project by choosing decorative plates with a bubble pattern on the outside ring rather than the more shabby chic metal trays that she used.
Overall, the process was very simple and the supplies were low-cost!
Supplies:
- 3 decorative plastic trays or plates
- 2 crystal candleholders (long enough to provide enough space between the trays -- I found some shorter candlesticks that came in packs of 2 and glued these together to form a longer one)
- Spray paint (my new fave is Valspar -- check my tips #1 and 2 below for tips on buying spraypaint and repurposing old pizza boxes when painting!)
- Glue (I used E3600 and Krazy Glue... see my tip #3 below for more info)
Instructions:
1. Prepare well-ventilated area for painting and spray away!
Awesome Tip #1: Next time you order from your favorite pizzeria, stash the empty box for future uses as a makeshift painting station. Just grab the crumb-free box (important -- shake it out first so that crust doesn't stick to your paint!) and place the item to be painted in it. Then you can tote the box around easily. For example, I like to paint outside, since any residue is quickly mowed away, so I placed the plates in their boxes, painted outside, and then carried the boxes into the garage for the plates to dry. Super easy!
Awesome Tip #2: I decided to try Valspar's chrome "odds and ends" spray paint for the candlesticks. I love this paint! It covered the candlesticks in one coat, and at $1.99 a pop, it was also affordable. I highly recommend it! I loved the shade so much that I decided to use it on my previously orange lamps, which I had painted weeks before but wasn't quite happy with...but I'll be posting later on the lamp redo.
2. Once you're satisfied with your painted baubles (the number of coats you have to do will depend on the shade/type of paint you select) and they're completely dry, it's gluing time! First, glue one candlestick to the bottom of the top plate. Flip the plate upside down and set a book on the candlestick to help the glue work its magic. Then, glue the other candlestick to the top of the bottom plate and again use a heavy book to help the glue set. Repeat the glue and book step by adding the middle plate to the mix: glue the top plate/candlestick conglomeration to the top of the middle plate, then glue to bottom plate/candlestick to the bottom of the middle plate.
I used a combo of E3600 and Krazy Glue for this task. Why, you may ask? Well, that leads into Awesome Tip #3! which is less of a tip and more of a me admitting my mistakes. I had never used E3600 before, so of course I slathered too much onto one of the chrome candlesticks. When the goopy glue met the silvery sheen, a messy chrome ooze resulted. Sadly, you can see the aftershocks of the mistake on the middle plate:

But, since the plate will be covered with stuff, it doesn't bug me too much! So the tip: be careful with your E3600 application, or just stick with Krazy Glue!
3. Let the trays sit overnight and then enjoy your beautiful creation!
Without further ado, a picture of my final result!

Since these colors fit so well with my kitchen, I am planning on using my trays as a "tea station" where I can store tea bags, sweeteners, creamers, and coffees! I staged this picture in my parents' kitchen, since I don't have one yet...but you get the idea!

I am also very tempted to make another one for sorting mail: one tier could hold bills, one cards/postcards, and the other catalogs/magazines...or I could do one for incoming, one for outgoing, and one for postage and stationery. I might wait until post-move to make this one, or I might go ahead and do it soon...time will tell!
Well, what do you think of dollar store craft recreation #1? Stay tuned for more!


No comments:
Post a Comment
Thank you so much for taking the time to leave a comment! I love to get feedback from my readers, or hear a little more about them!